Tutorials

Walk through every feature in CapiPark — from finding your first spot to running a busy parking zone. Use the buttons below to jump between tracks.

01

Create your account

Sign up with email and password, or use Google for one-click access. We ask for your phone number once so an owner can reach you if there's an issue with a booking — it's never shown publicly.

Create your account

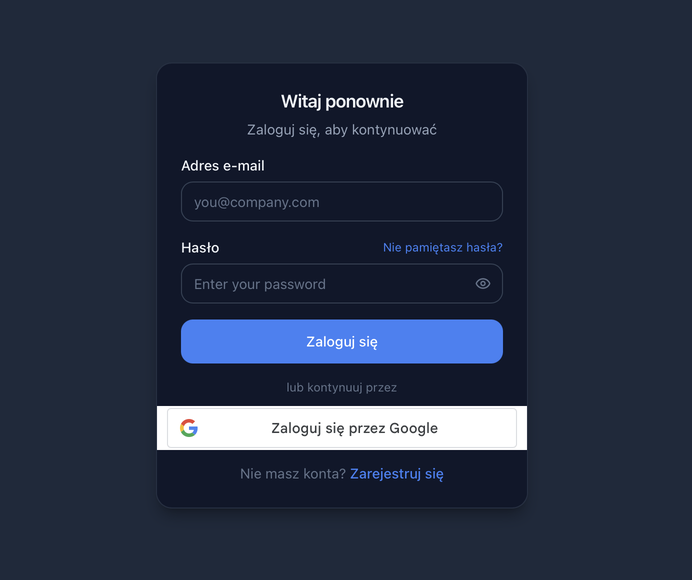
Sign-in screen with the one-click Google option highlighted.

02

Browse parking zones near you

On the Book page, search by address or zone name. CapiPark geocodes your query, finds every zone within 2 km, and sorts the results by distance so the closest options come first.

Browse parking zones near you

Search results with distance badges and a map preview — closest zone on top.

03

Pick a spot on the floor plan

Open any zone to see its interactive floor plan. Green spots are available, red are taken, your own bookings show in blue, and gray means temporarily unavailable. Click a green spot to select it. Zones without a floor plan show a simple grid of numbered spots instead — tap a number to select it.

1Step 1
Pick a spot on the floor plan

Real zone with a plan: green spots are free, red are taken by others, blue is your own booking. Tap a green spot to select it.

2Step 2
Pick a spot on the floor plan

After selecting a spot, the sidebar shows its type, the date, and the exact total price before you commit.

3Step 3
Pick a spot on the floor plan

Booking confirmed — the spot turns blue on the plan and appears in My Bookings.

04

Zones without a plan: book by spot number

Some parkings don't have a floor plan — instead you see a simple grid of numbered spots, exactly matching the numbers painted on the ground. The colors mean the same as on a plan: green is free, gray is taken. Tap a number, pick your date, and confirm.

1Step 1
Zones without a plan: book by spot number

A list-mode zone: numbered chips instead of a map, with the owner's "how to find your spot" note below.

2Step 2
Zones without a plan: book by spot number

After booking, your spot number is shown front and center together with the find-your-spot note.

05

Choose full day or custom hours

Toggle between a full-day booking and a custom hourly window. Pricing comes straight from the spot — hourly rate × number of hours, capped at the daily price when one is set.

Choose full day or custom hours

Hourly booking selected — the sidebar shows the live total for the chosen hours.

06

Use "Book Any" auto-assign

Some zones hide per-spot availability for privacy. You'll see all spots in neutral violet and a single "Book Any" button — CapiPark picks the cheapest available spot for the date and hours you chose. The price preview shows exactly what you'll pay (or "Free").

1Step 1
Use "Book Any" auto-assign

Hidden-availability zone — all spots render in neutral violet and the best-price preview sits above the Book Any button.

2Step 2
Use "Book Any" auto-assign

After Book Any, the confirmation reveals which spot was assigned to you, with the price you saw upfront.

07

Track and cancel your bookings

Every active booking lives on My Bookings, grouped by date. From there you can locate a spot on the map, view the owner's contact details, or cancel a booking you no longer need — the spot is freed instantly for someone else.

Track and cancel your bookings

My Bookings grouped by date, with locate, contact, and cancel actions on each card.

01

Create your first parking zone

Owners start by creating a zone: a name, an address, and a currency (PLN or EUR). The address is geocoded automatically so the zone shows up in renters' proximity searches. You also choose how to manage spots: draw them on a parking plan, or — if you don't have a plan — just list your spot numbers.

Create your first parking zone

New-zone form with the "Do you have a parking plan?" choice — pick "Just spot numbers" to skip the map editor entirely.

02

Upload a floor plan and add spots

In the desktop zone editor you can upload a floor-plan image and place spots on top of it. Each spot has a label (e.g. A1, B2), a type (standard, EV, accessible, motorcycle), and a draggable position with optional rotation.

1Step 1
Upload a floor plan and add spots

The desktop editor with spots laid out on the plan — drag any spot to match its real-world position.

2Step 2
Upload a floor plan and add spots

Click a spot to edit its label, type, prices, and availability schedule in the properties panel.

03

No parking plan? A shared list of numbered spots

If your parking doesn't have a floor plan, create the zone in list mode. You list your own spot under its painted number with your own price and schedule — and every other user (e.g. neighbors in a shared garage) adds theirs the same way, exactly like in plan mode. Add a "how to find your spot" note so renters can navigate without a map, and switch to plan mode later if you ever get one.

1Step 1
No parking plan? A shared list of numbered spots

The "Add your spot" form: number, type, and your own hourly/daily price.

2Step 2
No parking plan? A shared list of numbered spots

The community spot list — your spots are editable and badged "Yours"; other users' spots are read-only.

3Step 3
No parking plan? A shared list of numbered spots

The "how to find your spot" note replaces the map for renters — shown on the booking page and confirmation.

04

Set price and availability schedule

Each spot can have an hourly price, a daily price (which acts as a cap on hourly bookings), a weekly recurring schedule (e.g. Mon–Fri, 8 am–6 pm), and date-range overrides for holidays or maintenance.

Set price and availability schedule

Spot editor — weekly schedule on top, with a date-range exception below.

05

Hide availability for privacy

Switch "Hide availability" on for a zone to keep per-spot status private. Renters then see all spots in neutral violet and have to use "Book Any" — CapiPark still picks the cheapest available spot, and you preview the same price renters see.

1Step 1
Hide availability for privacy

Zone settings with the "Hide availability" option enabled, ready to save.

2Step 2
Hide availability for privacy

What renters see afterwards: neutral violet spots, no availability info — just the best price and Book Any.

06

See incoming bookings

The owner Bookings tab lists every booking on your spots, with the renter's name, contact details, date, and duration. Filter by date or zone to find a specific booking quickly.

See incoming bookings

Owner Bookings tab — one renter booking with name, contact (blurred), spot, zone, and date.

07

Cancel a booking with a reason

If something comes up, you can cancel a renter's booking yourself. A short reason is required (1–500 characters) — it's included in the email we send the renter so they understand what happened.

Cancel a booking with a reason

Owner cancel dialog with the reason filled in above the Confirm button.

08

Flag another user's spot

If a spot in your zone was added by someone else and looks wrong (wrong label, wrong price, bad position), flag it for admin review with a short reason — admins decide whether to dismiss the flag or remove the spot.

Flag another user's spot

Spot details panel with the flag-spot reason filled in.

09

Track earnings and bookings

The owner dashboard shows your recent earnings, the number of booked days and hours, and a list of your spots — so at a glance you know how each zone is performing.

Track earnings and bookings

Owner dashboard — 7-day earnings, booked days and hours, and the list of spots.

Across the platform

01

Looks great on mobile too

Every page is responsive. On phones, a sticky bottom bar keeps the Book button in reach while you pan the floor plan, and a bottom tab bar gets you between Dashboard, Book, Bookings, and More in one tap.

Looks great on mobile too

Mobile booking view — sticky "Book Any" bar pinned above the bottom tab bar.

Ready to try it yourself?

Create an account in under a minute — no payment details required.

Get started